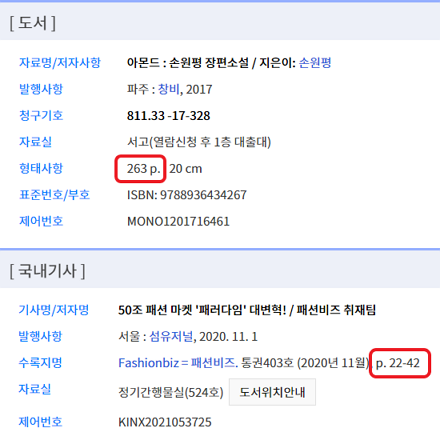
권호기사보기
| 기사명 | 저자명 | 페이지 | 원문 | 기사목차 |
|---|
| 대표형(전거형, Authority) | 생물정보 | 이형(異形, Variant) | 소속 | 직위 | 직업 | 활동분야 | 주기 | 서지 | |
|---|---|---|---|---|---|---|---|---|---|
| 연구/단체명을 입력해주세요. | |||||||||
|
|
|
|
|
|
* 주제를 선택하시면 검색 상세로 이동합니다.
표제지
제출문
요약문
SUMMARY
CONTENT
목차
제1장 서론 11
제1절 재료의 특성 및 구성 방정식 18
제2장 국내외 기술개발 현황 21
제1절 해외의 기술 현황 22
제2절 국내의 기술 현황 36
제3장 연구개발수행 내용 및 결과 37
제1절 초소성성형/확산접합 고온금형/압력제어 시스템 개발 38
제2절 티타늄 합금의 초소성/확산접합 기술 개발 85
제3절 공정 최적화 및 수치해석 프로그램 개발 270
제4절 샌드위치 일체화 구조물 개발 357
제5절 실험시제 축소모델 개발 및 성능평가 414
제4장 연구개발목표 달성도 및 대외기여도 532
제5장 연구개발결과의 활용계획 536
제6장 참고문헌 554
부록 : 초소성성형/확산접합 공정해석 프로그램 사용설명서 575
그림 1-1-1. The schematics of SPF process 16
그림 1-1-2. The schematics of SPF/DB process 17
그림 1-1-3. The relationship between (a) logarithmic plot of σ vs ε (b) variation of m for different strain rate ε(이미지참조) 20
그림 2-1-1. F-15E전투기의 초소성성형/확산접합 적용전(a)과 적용후(b)의 후방동체 내부 23
그림 2-1-2. 복잡한 형상의 Diffuse Nozzle[10] 25
그림 2-1-3. 동시성형한 샌드위치 구조물[11] 26
그림 2-1-4. 중국에서 개발중인 티타늄합금과 사용온도 및 개발주체 35
그림 3-1-1. 성형용 유압장비의 최대용량 조사결과 40
그림 3-1-2. 초소성 성형 장치 개념도 43
그림 3-1-3. 초소성 성형용 프레스 개념도 45
그림 3-1-4. 초소성 성형 장비에 설치된 Servo-Valve 도면 46
그림 3-1-5. (a) Servo-Valve 및 (b) LVDT 47
그림 3-1-6. 프레스... 48
그림 3-1-7. 가열로 안... 53
그림 3-1-8. 3차 가열로 최종안 54
그림 3-1-9. 초소성 장비 개념도 57
그림 3-1-10. 초소성 장비 제어용 프로그램 구성창 58
그림 3-1-11. Toko-Valex사 압력 valve 59
그림 3-1-12. Moog사 압력 Valve 60
그림 3-1-13/3-1-14. 압력제어 구성 63
그림 3-1-14/3-1-15. 압력제어 upgrade안 64
그림 3-1-15/3-1-16. 가스 배관 개략도 65
그림 3-1-16/3-1-17. 설치완료한 가스압력제어장비 67
그림 3-1-17/3-1-18. 가스압력제어장비에 설치된 Valve 68
그림 3-1-18/3-1-19. 압력제어 프로그램 메인 메뉴 69
그림 3-1-19/3-1-20. 압력제어 단계 입력창 70
그림 3-1-20/3-1-21. 입력 제어 패턴 테스트용 70
그림 3-1-21/3-1-22. 각종 센서의 보정 메뉴 71
그림 3-1-22/3-1-23. 각종 센서의 PID 제어 메뉴 71
그림 3-1-23/3-1-24. 초소성 성형시 일반적인 압력-시간 선도 73
그림 3-1-24/3-1-25. 압력제어시스템 평가(4㎏/㎝2, 50초 상승, 50초 하강 패턴) 74
그림 3-1-25/3-1-26. 압력제어시스템 평가(4㎏/㎝2, 100초 상승, 100초 하강 패턴) 75
그림 3-1-26/3-1-27. 압력제어시스템 평가((6㎏/㎝2)... 76
그림 3-1-27/3-1-28. 성형상태 표시창 78
그림 3-1-28/3-1-29. 제작한 모금형의 도면 82
그림 3-1-29/3-1-30. HK 금형제료의 규격서 83
그림 3-1-30/3-1-31. 설치완료한 초소성성형/확산접합 성형장비 및 치구 84
그림 3-2-1. 소재의 관찰 방향 95
그림 3-2-2. Lot 1 소재의 초기조직 광학사진:... 96
그림 3-2-3. Lot 2 소재의 초기조직 광학사진:... 97
그림 3-2-4. EL1급 Ti-6A1-4V 합금의 열처리 별 냉각사진... 99
그림 3-2-5. 베타변태온도 측정을 위한 DSC-TGA 결과 100
그림 3-2-6. 온도 변화에 따른 베타상의 분율 변화 102
그림 3-2-7. Lot 1 소재의 변형율 속도 10-³s-¹에서의 FE-SEM 사진(이미지참조) 106
그림 3-2-8. Lot 1 소재의 10-³s-¹, 850℃에서 FE-SEM 사진...(이미지참조) 109
그림 3-2-9. Lot 1 소재의 850℃, 10-²s-¹에서의 고온 인장시험결과(이미지참조) 111
그림 3-2-10. Lot 1 소재의 850℃, 10-²s-¹에서의 고온 인장시험 후 시편형상(이미지참조) 111
그림 3-2-11. 고온 일축인장실험에 사용된 시편형상 115
그림 3-2-12. 고온 일축인장실험 기기 Instron 1361 116
그림 3-2-13. Lot 1 소재의 변형율 속도 10-²s-¹에서 일축인장실험 결과(이미지참조) 117
그림 3-2-14. Lot 1 소재의 변형율 속도 10-²s-¹에서 일축인장실험 후 시편 형상(이미지참조) 117
그림 3-2-15. Lot 1 소재의 변형율 속도 10-³s-¹에서 일축인장실험 결과(이미지참조) 118
그림 3-2-16. Lot 1 소재의 변형율 속도 10-³s-¹에서 일축인장실험 후 시편 형상(이미지참조) 118
그림 3-2-17. Lot 1 소재의 변형율 속도 10-⁴s-¹에서 일축인장실험 결과(이미지참조) 119
그림 3-2-18. Lot 1 소재의 변형율 속도 10-⁴s-¹에서 일축인장실험 후 시편 형상(이미지참조) 119
그림 3-2-19. Lot 2 소재의 변형율 속도 10-²s-¹에서 일축인장실험 결과(이미지참조) 120
그림 3-2-20. Lot 2 소재의 변형율 속도 10-²s-¹에서 일축인장실험 후 시편 형상(이미지참조) 120
그림 3-2-21. Lot 2 소재의 변형율 속도 10-³s-¹에서 일축인장실험 결과(이미지참조) 121
그림 3-2-22. Lot 2 소재의 변형율 속도 10-³s-¹에서 일축인장실험 후 시편 형상(이미지참조) 121
그림 3-2-23. Lot 1 소재의 10-²s-¹에서의 FE-SEM 사진(이미지참조) 123
그림 3-2-24. Lot 1 소재의 10-³s-¹에서의 FE-SEM 사진(이미지참조) 124
그림 3-2-25. Lot 1 소재의 10-⁴s-¹에서의 FE-SEM 사진(이미지참조) 125
그림 3-2-26. (a) 변형율 속도와 응력의 관계, (b) 변형율 속도에 따른 m 값 129
그림 3-2-27. SEM micrographs of ELI grade Ti-6Al-4V alloy at strain rate of 10²s¹:.... 131
그림 3-2-28. SEM micrographs of ELI grade Ti-6Al-4V alloy at strain rate of 10-³s-¹:....(이미지참조) 132
그림 3-2-29. SEM micrographs of ELI grade Ti-6Al-4V alloy at strain rate of 10⁴s¹:.... 133
그림 3-2-30. Logarithmic plot of stress vs strain rate for the present alloy.... 135
그림 3-2-31. Plot of stress vs inverse of temperature for the calculation of activation. 138
그림 3-2-32. Tool and specimen for the investigating diffusion bonding condition 144
그림 3-2-33. Cutting shape for the observation of microstructure and interface. 145
그림 3-2-34. Normalized weight gain with respect to oxidation time 146
그림 3-2-35. plot of (Δ W/A)² versus time for obtaining the oxidation rate constant 147
그림 3-2-36. Arrhenius plot of parabolic rate constant for oxidation of Ti-6A1-4V in the temperature range 850-950℃ 148
그림 3-2-37. Typical stress-strain curves of ELI Ti-6A1-4V alloy at a strain of 10-²s-¹(이미지참조) 150
그림 3-2-38. Elongation results of ELI Ti-6A1-4V alloy at a strain rate 10-²s-¹(이미지참조) 150
그림 3-2-39. (a) β-transus temperature measured by using DSC-TGA apparatus and annealed microstructures quenched from (b) 960℃, (c)963℃ and (d) 966℃, respectively. 155
그림 3-2-40. Variation of β volume fraction with respect to temperatures. 156
그림 3-2-41. Typical stress-strain curves of the present alloy at strain rates of (a)10-²s-¹, (b)10-³s-¹and (c)10-⁴s-¹ and macrographs of specimens at strain rates of (d)10-²s-¹, (e)10-³s-¹and (f)10-⁴s-¹.(이미지참조) 157
그림 3-2-42. Comparison of elongation-to-failure for the reported and the present alloy. 158
그림 3-2-43. Comparison of elongation-to-failure and β volume fraction with various temperatures. 160
그림 3-2-44. SEM micrograph of conventional ELI grade Ti-6A1-4V alloy 164
그림 3-2-45. Optical micrographs and vickers microhardenss of the Ti-6A1-4V(process C) 170
그림 3-2-46. Optical micrographs and vickers microhardenss of the Ti-6A1-4V alloy 171
그림 3-2-47. Optical micrographs of 3-sheet SPF/DB 172
그림 3-2-48. Holmquist's work via HIP process (Scripta Mater. vol. 39(1998) p. 1101) 173
그림 3-2-49. Elmer's work (Mater. Sci. Eng. A vol. 391(2005) p. 104) 174
그림 3-2-50. SEM micrographs of DB-#4 175
그림 3-2-51. SEM micrographs of process C 176
그림 3-2-52. Optical micrographs of Ti-6A1-4V alloy showing α-scale layer in a surface. 178
그림 3-2-53. Micrographs of the Ti-6A1-4V alloy component. 181
그림 3-2-54. Vickers Microhrdness of Ti-6A1-4V (그림 3-2-53) 182
그림 3-2-55. Optical micrographs of Ti-6A1-4V alloy component. 183
그림 3-2-56. Optical micrographs of Ti-6A1-4V alloy component. 184
그림 3-2-57. Vickers Microhardness of Ti-6A1-4V 그림(14) 185
그림 3-2-58. 동적구상화 방법에 대한 개략도 188
그림 3-2-59. 동적 재료모델의 개념도... 193
그림 3-2-60. 고온 열처리에 의한 미세조직 변화 :... 194
그림 3-2-61. 고온압축실험시 유동응력 곡선 195
그림 3-2-62. 변형량 변화에 따른 마르텐사이트 초기조직의 변형지도 196
그림 3-2-63. 변형량 1.4 에서의 미세조직:... 198
그림 3-2-64. 변형량 1.4 에서의 미세조직:... 199
그림 3-2-65. 온도 900℃, 변형속도 10-¹s-¹에서 미세조직:...(이미지참조) 200
그림 3-2-66. 변형량 1.4, 온도 850℃ 에서의 미세조직 변화:... 201
그림 3-2-67. 변형량 1.4. 변형속도 10-²s-¹에서의 미세조직 변화:...(이미지참조) 202
그림 3-2-68. 변형지도와 미세조직 비교 204
그림 3-2-69. 압축율에 따른 진변형율의 FEM 해석 205
그림 3-2-70. 변형량, 변형속도, 온도 변화에 따른 동적 구상화 분율 변화 206
그림 3-2-71. ELI Ti-6A1-4V 합금의 미세조직:... 211
그림 3-2-72. ELI Ti-6A1-4V 합금의 875℃에서 인장실험 결과 212
그림 3-2-73. ELI Ti-6A1-4V 합금의 875℃에서 인장실험 후 시편형상 212
그림 3-2-74. 이전 결과와 연신율 비교 213
그림 3-2-75. 상용급 Ti-6A1-4V 합금의 미세조직:... 214
그림 3-2-76. 상용급 Ti-6A1-4V 합금의 700℃에서 인장실험 결과 215
그림 3-2-77. 상용급 Ti-6A1-4V 합금의 700℃에서 인장실험 후 시편형상 215
그림 3-2-78. 상용급 Ti-6A1-4V 합금의 750℃에서 인장실험 결과 216
그림 3-2-79. 상용급 Ti-6A1-4V 합금의 750℃에서 인장실험 후 시편형상 216
그림 3-2-80. 상용급 Ti-6A1-4V 합금의 800℃에서 인장실험 결과 217
그림 3-2-81. 상용급 Ti-6A1-4V 합금의 800℃에서 인장실험 후 시편형상 217
그림 3-2-82. 이전 결과와 연신율 비교 218
그림 3-2-83. Equiaxed microstructure of Ti-6A1-4V alloy:.... 221
그림 3-2-84. The three orthogonal plaines, X, Y, and Z 222
그림 3-2-85. Shearing patterns associated with different processing routes 223
그림 3-2-86. TEM micrographs showing α phase grains in 4 ECA pressed Ti-6A1-4V alloy:.... 226
그림 3-2-87. Variation of room temperature tensile properties of 4 ECA pressed Ti-6A1-4V alloy with subsequent heat treatments. 227
그림 3-2-88. (a) Typical true stress-strain curves and (b) appearance of specimens for 4 ECA pressed Ti-6A1-4V alloy tested at 600℃ and 10-⁴(이미지참조)/s after different subsequent heat treatments. 228
그림 3-2-89. Comparison of elongations of UFG Ti-6A1-4V alloy obtained in the present study and in the other studies. 229
그림 3-2-90. Schematic illustration of ECA pressing die used to impose shear deformation within the main deformation zone (marked abc). 233
그림 3-2-91. Macrographs of lamellar microstructure after a single ECA pressing at various strain rate of (a) 1.34 s¹, (b) 0.67 s¹, (c) 0.27 s¹, (d) 0.05 s¹ respectively.... 237
그림 3-2-92. Typical optical and TEM micrograph of lamellar microstructure after a singe ECA pressing at a strain rate of 0.27 s¹ in the vicinity of (a) and (b) colony boundary (CB), and (c) and (b) lamellar interface in the segment region. 240
그림 3-2-93. Typical TEM micrograph of lamellar microstructure showing kinking and fragmenting behavior after a single ECA pressing at a strain rate of 0.27 s¹. 241
그림 3-2-94. (a) Typical true stress-strain curves and (b) appearance of specimens for 4 ECA pressed Ti-6A1-4V alloy tested at various temperatures and strain rates. 245
그림 3-2-95. A logarithmic piot of the stress-strain rate for both UFG (0.3μm) and coarse grained (11μm) structures at temperatures of 600℃, 650℃ and 700℃. 246
그림 3-2-96. Cavitation in the as-ECAPed Ti-6A1-4V alloy :... 248
그림 3-2-97. TEM micrographs and corresponding SAED patterns of UFG Ti-6A1-4V alloy after :... 251
그림 3-2-98. Resulting elongations of low temperature superplasticity of UFG Ti-6A1-4V alloy. 252
그림 3-2-99. Comparison of experimental stress - strain rate data tested at 973K and fitted curves for Ti-6A1-4V alloy with various grain sizes of:.... 253
그림 3-2-100. Relative contribution of each deformation mechanism at 973K and 10-⁴s-¹(이미지참조). 254
그림 3-2-101. SEM micrograph showing scratch offsets of UFG samples compressed up to strain of 0.1 at 973K and 10-⁴s-¹(이미지참조) 255
그림 3-2-102. OM images of (a) 4 and (b) 8 ECAPed SMG alloys, and TEM micrographs of (c) 4 and (d) 8 ECAPed SMG alloys.... 260
그림 3-2-103. OM micrographs taken in the vicinity of fracture tips of (a) CG, (b) 4 and (c) 8 ECAPed SMG Ti-6A1-4V tested at 973K and 10-⁴s-¹(region II)....(이미지참조) 261
그림 3-2-104. Cavity growth maps of cavity radius with respect to grain size for (a) CG, (b) 4 and (c) 8 ECAPed SMG Ti-6A1-4V tested at 973 and 10-⁴s(이미지참조) 262
그림 3-2-105. Equiaxed microstructure of Ti-6A1-4V alloy:... 265
그림 3-2-106. TEM micrographs of ECA pressed equiaxed microstructure taken from the Y plane:... 269
그림 3-3-1. The schematic diagram for contact condition between the two bodies 275
그림 3-3-2. Subdivided boxes in hierarchical structure 277
그림 3-3-3. Box division of tool into two levels in 3-D 278
그림 3-3-4. Contact searching 280
그림 3-3-5/3-3-6. Tool segment to find exact contact position and penetration 285
그림 3-3-6/3-3-7. Natural coordinate for tool segment 285
그림 3-3-7/3-3-8. Modified Coulomb friction law to deal with slip-stick condition 286
그림 3-3-8/3-3-9. Box division of tool and tool I (blank) into two levels 291
그림 3-3-9/3-3-10. Inner-blank contact (tying condition) 292
그림 3-3-10/3-3-11. β factor as a functional of fractional norm Nf(이미지참조) 295
그림 3-3-11/3-3-12. Effective hardening curve and modification to deal with blank unloading 296
그림 3-3-12/3-3-13. Flow chart for SPF/DB analysis program 299
그림 3-3-13/3-3-14. The postprocessor (Sherpa) for SPF and SPF/DB 300
그림 3-3-14/3-3-15. Drawing and FE model of fuel tank 302
그림 3-3-15/3-3-16. Evolution of deformed profiles at various forming times in a fuel tank 304
그림 3-3-16/3-3-17. Variation of pressure and maximum effective strain rate with forming time in a fuel tank 305
그림 3-3-17/3-3-18. Comparison of predicted thickness in a fuel tank 306
그림 3-3-18/3-3-19. Variation of flow stress and forming pressure with forming time without and with grain growth 308
그림 3-3-19/3-3-20. Variation of maximum effective strain rate with forming time and comparison of thickness for grain growth in a fuel tank 309
그림 3-3-20/3-3-21. Variation of grain size in a fuel tank 310
그림 3-3-21/3-3-22. Drawing and FE model of double cup 312
그림 3-3-22/3-3-24. Variation of pressure and maximum effective strain rate with forming time for double cup 314
그림 3-3-24/3-3-25. Comparison of deformed shape between computation and experiment.... 315
그림 3-3-25/3-3-26. Diffusion bonded blanks, initial tool geometry and finite element mesh 319
그림 3-3-26/3-3-27. Evolution of deformed profiles at various forming times in a sandwich panel(t1=2.0㎜, t2=1.6㎜) 320
그림 3-3-27/3-3-28. Evolution of deformed profiles at various forming times in a sandwich panel (t1=3.0㎜, t2=0.6㎜) 321
그림 3-3-28/3-3-29. Variations of pressure and maximum effective strain rate with forming time for sandwich panel 322
그림 3-3-29/3-3-30. Measuring positions of sandwich Panel 323
그림 3-3-30/3-3-31. Process to fabricate multicell 1 box for SPF/DB 325
그림 3-3-31/3-3-32. Diffusion bonded blanks, initial tool geometry and finite element mesh 326
그림 3-3-32/3-3-33. Evolution of deformed profiles at various forming times in a multicell box 327
그림 3-3-33/3-3-34. Variation of pressure and maximum effective strain rate with forming time for multicell box at tying condition 328
그림 3-3-34/3-3-35. Measuring positions of multicell box 329
그림 3-3-35/3-3-36. Diffusion bonded blanks, initial tool geometry and finite element mesh 331
그림 3-3-36/3-3-37. Evolution of deformed profiles at various forming times in a four circular blanks 332
그림 3-3-37/3-3-38. Evolution of inner contact in a four blanks at tying condition 333
그림 3-3-38/3-3-39. Variation for pressure and the effective strain rate with forming time for four circular blanks at tying condition 334
그림 3-3-39/3-3-40. Comparison of deformed shape with Bellet's result [160] and SPFORM3D/DB result 335
그림 3-3-40/3-3-41. Measuring positions of four circular blanks 336
그림 3-3-41/3-3-42. Schematics of 3-sheet forming by diffusion bonding 341
그림 3-3-42/3-3-43. Deviation at the center (tool and blank) 343
그림 3-3-43/3-3-44. Plot of main effect of SN ratio 344
그림 3-3-44/3-3-45. Tool geometry and stop-off patterning 346
그림 3-3-45/3-3-46. Evolution of deformed shape at different times for 3-sheet forming 347
그림 3-3-46/3-3-47. Variation of pressure and strain rate with time for 3-sheet forming 348
그림 3-3-47/3-3-48. Tool geometry for step-by-step pressurization 351
그림 3-3-48/3-3-49. Schematic of step-by-step pressurization 352
그림 3-3-49/3-3-50. Evolution of deformed shapes for different 1st pressurization time 353
그림 3-3-50/3-3-51. Evolution of deformed shapes with different time for two-step pressurization (1st pressurization time: 360sec) 354
그림 3-3-51/3-3-52. Variation of pressure and strain rate with time for 3-sheet forming (1st pressurization time: 360sec) 355
그림 3-3-52/3-3-53. Comparison of final shapes with different pressurization methods:... 356
그림 3-4-1. 성형 대상제품 및 초기 geometry 358
그림 3-4-2. 초기 해석모델의 시간에 따른 판재 변형상태 360
그림 3-4-3. Pole part 두께변경 (Case S-II) 362
그림 3-4-4. 확산접합 패턴 변경 (Case S-III) 363
그림 3-4-5. 중간금형 형상 365
그림 3-4-6. Case I에 대한 해적결과 - 시간에 따른 변형형상 367
그림 3-4-7. Case ll에 대한 해석결과 - 시간에 따른 변형형상 368
그림 3-4-8. Case III에 대한 해석결과 - 시간에 따른 변형형상 369
그림 3-4-9. 계단형 중간금형(Case D-III)과 변형된 확산접합 패턴(Case S-III)을 이용한 경우에 대한 해석결과 (Case IV) 370
그림 3-4-10. Case V에 대한 해석결과 - 시간에 따른 변형된 형상 371
그림 3-4-11. Case Vl에 대한 해석결과 - 시간에 따른 변형형상 372
그림 3-4-12. FE model of 3-sheet 374
그림 3-4-13. Evolution of deformed shape at different forming time thickness distribution 375
그림 3-4-14. Diffusion bonded blanks and initial tool geometry 378
그림 3-4-15. Comparison of deformed profiles at various forming time in a three blanks 379
그림 3-4-16. Variation of pressure and the maximum effective strain rate with forming time for three blanks 380
그림 3-4-17. Comparison of deformed shape between experiment[193]and computation.... 381
그림 3-4-18/3-4-19. Deformed shape at SPFORME2D 382
그림 3-4-19/3-4-20. Deformed shape 383
그림 3-4-20/3-4-21. 확산접합 패턴 385
그림 3-4-21/3-4-22. 초소성 성형 시험을 위한 압력 프로파일 386
그림 3-4-22/3-4-23. Upper Chamber Core Sandwich Panel 388
그림 3-4-23/3-4-24. Flange for Sealing 389
그림 3-4-24/3-4-25. Liner Plate ( t=1.5) 390
그림 3-4-25/3-4-26. 성형가스 누설로 인한 성형 실패 예 391
그림 3-4-26/3-4-27. 실제 성형품과 예측된 변형 형상의 비교 392
그림 3-4-27/3-4-28. 성형된 3-sheet panel 393
그림 3-4-28/3-4-29. 4 sheet 샌드위치 패널 형상 및 접합 패턴 395
그림 3-4-29/3-4-30. 해석모델 396
그림 3-4-30/3-4-31. Diffusion bonded sheet and initial die geometry and finite element mesh 398
그림 3-4-31/3-4-32. Evolution of deformed shape at different forming times 399
그림 3-4-32/3-4-33. Evolution of inner contact shape at different forming times 400
그림 3-4-33/3-4-34. Comparison of pressure-time curve 401
그림 3-4-34/3-4-35. Comparison of off.... 401
그림 3-4-35/3-4-36. Comparison of final deformed shapes 402
그림 3-4-36/3-4-37. Measuring position 403
그림 3-4-37/3-4-38. Optimal strain rate이 5×10-⁴(이미지참조)/sec인 경우 t=7800sec에서 최대 성형압력 제한에 따른 판재의 변형형상 405
그림 3-4-38/3-4-39. Optimal strain rate : 1×10-³(이미지참조)sec인 판재를 최대 성형압력 3.0MPa로 t=5340 sec 까지 성형하였을 경우의 판재 변형형상 406
그림 3-4-39/3-4-40. Pressure-time curve and off.... 407
그림 3-4-40/3-4-41. 압력 프로파일 407
그림 3-4-41/3-4-42. 4-sheet sandwich 치구 도면 409
그림 3-4-42/3-4-43. SPF/DB Press에 장착한 4-sheet sandwich 치구 410
그림 3-4-43/3-4-44. 4-sheet 샌드위치 패널의 치구 및 성형후 시편 411
그림 3-4-44/3-4-45. 성형된 제품의 단면과 해석결과의 비교 412
그림 3-4-45/3-4-46. SPF/DB Sandwich Panel form 4 sheets Ti-6A1-4V. 413
그림 3-5-1. 인공신경망 기법의 신뢰도 416
그림 3-5-2. 등축상을 제어하기 위한 두 가지 공정 418
그림 3-5-3. 변형온도 1073K, 변형량 1.0, 변형속도 10-¹s-¹에서의 SEM 사진(이미지참조) 419
그림 3-5-4. (a) 완전한 동적 구상화와 (b) 부분적 동적 구상화 이후 추가 열처리에 의해 제어된 (b) 등축 조직의 TEM사진 420
그림 3-5-5. 변형속도와 응력과의 관계, 기울기는 m을 나타냄 421
그림 3-5-6. 동적 구상화 기구의 개략도 422
그림 3-5-7. 초소성 성형 후 공동의 생성 :... 432
그림 3-5-8. 동적 구상화된 소재의 초소성 이후 경각경계... 433
그림 3-5-9. 동적 구상화 이후 소재의 미세 조직 사진 434
그림 3-5-10. 초소성 후의 핵생성 장소 및 행태... 435
그림 3-5-11. 축소형 구형 압력용기의 형상. 438
그림 3-5-12. free bulging 해석을 위한 초기 유한요소 모델 441
그림 3-5-13. final sizing을 위한 초기 유한요소 모델 442
그림 3-5-14. 1차 free bulging 단계에서 시간에 따른 변형형상 및 total equivalent plastic strain의 분포 444
그림 3-5-15. 2차 free bulging 종료 후 변형모습(1978sec) 445
그림 3-5-16. 성형 시간에 따른 반경 변화 446
그림 3-5-17. 압력 프로파일 446
그림 3-5-18. free bulging 후 실제 형상 및 해석형상 비교 447
그림 3-5-19. Final sizing 공정에서 시간에 따른 변형상태 및 total equivalent plastic strain 분포 449
그림 3-5-20. 민수용 축소 시제품의 형상 450
그림 3-5-21. Stop-off로 도포한 DB시편 및 치구 452
그림 3-5-22. DB시편 장착 사진 453
그림 3-5-23. 확산접합 시편의 도면 (#7) 454
그림 3-5-24. 확산접합 치구 및 시편 #7 455
그림 3-5-25. DB 후 비파괴 검사 결과 발견된 미접착 부위(#6) 456
그림 3-5-26. 확산접합 시편 #7의 비파괴검사 결과(원주방향으로 균일하게 접합되었음) 457
그림 3-5-27. 확산접합 시편 #7의 비파괴검사 결과(Amplitude 비교) 458
그림 3-5-28. Blow Forming을 위한 치구도면 462
그림 3-5-29. Blow Forming 치구의 상/하Plate 463
그림 3-5-30. Blow Forming 치구의 확장 Plate 464
그림 3-5-31. 구형압력용기 1차성형 압력프로파일 465
그림 3-5-32. 시편#7의 1단계 Blow forming후의 형상 466
그림 3-5-33. 1단계 Blow forming 후의 모습 467
그림 3-5-34. 시편 #7의 Blow forming 모습 468
그림 3-5-35. 성형완료된 모습 469
그림 3-5-36. 시편 #7의 성형후 측정한 dimension 470
그림 3-5-37. 시편 #7의 최종 성형 모습 471
그림 3-5-38. final sizing 단계의 압력 프로파일 472
그림 3-5-39. 최종 성형품의 두께분포 비교 473
그림 3-5-40. 탱크 두께측정 결과 (No. 7) 475
그림 3-5-41. 탱크 두께측정 결과 (No. 9) 476
그림 3-5-42. 탱크 변형률 측정을 위한 변형률 게이지 부착도 477
그림 3-5-43. 시험치구에 장착된 모습 478
그림 3-5-44. KEOP 가압 프로파일 (No. 7) 480
그림 3-5-45. 입증압 가압 프로파일 (No. 7) 480
그림 3-5-46. MEOP에서 상반구 변형률 (No. 7) 481
그림 3-5-47. MEOP에서 하반구 변형률 (No. 7) 481
그림 3-5-48. Proof에서 상반구 변형률 (No. 7) 482
그림 3-5-49. Proof에서 하반구 변형률 (No. 7) 482
그림 3-5-50. 7번 탱크 파손모습 483
그림 3-5-51. 입중압 가압 프로파일 (No, 9) 485
그림 3-5-52. Burst 시험 가압 프로파일 (No. 9) 485
그립 3-5-53. MEOP에서 상반구 변형률 (No. 9) 486
그림 3-5-54. MEOP에서 하반구 변형률 (No. 9) 486
그림 3-5-55. Proof에서 상반구 변형률 (No. 9) 487
그림 3-5-56. Proof에서 하반구 변형률 (No. 9) 487
그림 3-5-57. Burst에서 상반구 변형률 (No. 9) 488
그림 3-5-58. Burst에서 하반구 변형률 (No. 9) 488
그림 3-5-59. 9번 탱크 파손모습 489
그림 3-5-60. 램젯엔진 연료탱크 개략적인 축소형상 493
그림 3-5-61. 램젯엔진 연료탱크 494
그림 3-5-62. 예비성형체 type 1 495
그림 3-5-63. 예비성형체 type 2 495
그림 3-5-64. 예비성형체 type 3 495
그림 3-5-65. 축소형 램젯엔진 연료탱크 성형을 위한 금형 단면형상 496
그림 3-5-66. 예비성형체 type 1에 대한 성형해석 결과 - 유효변형률 분포 498
그림 3-5-67. 예비성형체 type 1에 대한 압력 프로파일 선도 499
그림 3-5-68. 예비성형체 type 2에 대한 해석결과 - 유효변형률 분포 500
그림 3-5-69. 예비성형체 type 3에 대한 해석결과 - 유효변형률 분포 501
그림 3-5-70. type 3에 대한 성형압력 프로파일 502
그림 3-5-71. 축소형 램젯엔진 연료탱크 성형 금형(Upper Plate) 503
그림 3-5-72. 축소형 램젯엔진 연료탱크 성형 금형(Lower Plate) 504
그림 3-5-73. 축소형 램젯엔진 연료탱크 성형 금형(Slive-1) 504
그림 3-5-74. 축소형 램젯엔진 연료탱크 성형 금형(Slive-2) 505
그림 3-5-75. 성형직후의 축소형 시제품 및 치구 506
그림 3-5-76. 축소형 램젯엔진 연료탱크 507
그림 3-5-77. T-50 duct 부품의 형상특징을 추출한 모델 형상 509
그림 3-5-78. T-50 duct 부품의 개요 및 요구 대표적인 요구특성 510
그림 3-5-79. Ti-6Al-4V Duct 부품 511
그림 3-5-80. T-50 duct 금형 512
그림 3-5-81. 경계조건 설정 모델 514
그림 3-5-82. 1번 경계조건에 따른 (a), (b) 두께 및 (c), (d) 변형율 분포 예측 515
그림 3-5-83. 2번 경계조건 설정 모델 516
그림 3-5-84. 2번 경계조건에 따른 (a), (b) 두께 및 (c), (d) 변형율 분포 예측 517
그림 3-5-85. 3번 경계조건 설정 모델 518
그림 3-5-86. 3번 경계조건에 따른 (a), (b) 두께 및 (c), (d) 변형율 분포 예측 519
그림 3-5-87. 4번 경계조건 설정 모델 520
그림 3-5-88. 4번 경계조건에 따른 (a), (b) 두께 및 (c), (d) 변형율 분포 예측 521
그림 3-5-89. 장축방향으로 길이 분포 522
그림 3-5-90. 단축방향으로 길이 분포 523
그림 3-5-91. 압력시간선도 524
그림 3-5-92. 일정변형율속도 유지 성능 525
그림 3-5-93. 시제품 평가 부위 527
그림 3-5-94. 2.3㎜ 판재 부품의 형상 측정 결과 528
그림 3-5-95. 2.3㎜ 판재 부품 (a)두께 및 (b) 변형율 분포 529
그림 3-5-96. Duct A부위의 두께방향의 미세조직 531
그림 4-1-1. 고온 금형/압력제어 시스템 및 기술개발... 535
그림 5-1-1. 시험개발단계시 개발예상 부품 개략도... 543
| 등록번호 | 청구기호 | 권별정보 | 자료실 | 이용여부 |
|---|---|---|---|---|
| T000023252 | 전자형태로만 열람가능함 | 이용불가 |
*표시는 필수 입력사항입니다.
| 전화번호 |
|---|
| 기사명 | 저자명 | 페이지 | 원문 | 기사목차 |
|---|
| 번호 | 발행일자 | 권호명 | 제본정보 | 자료실 | 원문 | 신청 페이지 |
|---|
도서위치안내: / 서가번호:

우편복사 목록담기를 완료하였습니다.
*표시는 필수 입력사항입니다.
저장 되었습니다.